Welcome to the first tutorial of a multi part series on blogging using Jekyll on Github. Github has an awesome free option for hosting a blog for you and you can get a blog up and running in 10 minutes or less. This series will cover everything that you to know to host, manage and customized a Jekyll blog that is hosted on Github.
Section 1: Overview
Github uses the Jekyll engine which turns markdown into static Html pages. The advantage of this is that performance is better since you are just serving up html and you don’t have to worry about hosting a database somewhere .
The quickest and easiest way to get started with Jekyll is fork an existing Jekyll repository. Forking in Git means creating a copy of the repository into your account.
The repository that I used and recommend to fork is the “Jekyll Now” repository at https://github.com/barryclark/jekyll-now. The Jekyll based repository includes a lot of very useful features for a blog out of the box for you such as: a nice looking theme, code syntax highlighter, social buttons (twitter, Facebook, Github, etc), Disqus blog commenting api, and Google analytics.
Section 2: Forking the Repository
Forking a repository in Github is extremely simple. Go to https://github.com/barryclark/jekyll-now and click the  button. Github will now create a fork of the repository for you into your account.
Section 3: Renaming the Repository
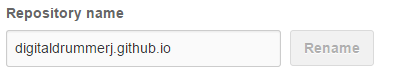
Once you fork the repository, you will need to go into the settings for your new repository and rename it to [username].github.io. Your blog will now be live within a few minutes at http://[username].github.io. However, before you go look at the blog, you need to take a minute to configure a few items in the configuration file _config.yml.
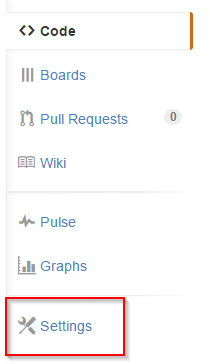
Getting to settings
Renaming
Finding the settings:

Update the name and click the Rename button
Section 4: Configuring the Repository
There is only 3 values that you are going to want to change:
- name - this is the blog title
- description - this is the tag line
- url - this is the url of the blog, will be [username].github.io.
Optionally, you can also configure your social networks that show up in the footer of the site by filling in the various account names in the “footer-links” section of the _config.yml file.
You can edit the _config.yml directly in Github. Click on the file and then click the  icon. Once you have completed your edits, click the green commit button at the bottom of the screen.
Section 5: Viewing the Blog
Now you are ready to view your new blog. Open a browser and navigate to http://[username].github.io, replacing [username] with your actual username.
Conclusion
In just a few simple steps, you were able to get your blog up and running. Through out the series of lessons, you will learn how to manage your blog, create new pages, customize the theme, and host it with a custom domain name.
In the next lesson, where we create your first blog post.