Note: This post applies to Angular. The 2+ version of Angular.
Welcome to the series on Getting Started with Angular. Angular 2 was released in September 2016 and and so far I have been enjoying working with it. I have been using the TypeScript version of Angular 2. It is has been pretty easy for me so far to pick it up but there have been a few things that have made me scratch me head. In this series I am going to walk you through creating a simple Angular 2 project that has a header/footer, routing to components/modules, show how to add new components/services, create multiple modules, lock down routes, changing UI configurations based on the environment parameter and adding in the Bootstrap library. When you are done with the series, you will have a good structure for any project that you want to start.
In this post we will get everything setup on your machine to do Angular development and then you will create your Angular project that the rest of the series will build on. We will be using the new Angular CLI to generate the project and several of the features such as components, services, modules, and pipes.
Installing The Angular CLI
The Angular CLI is a node based utility which means that we need to first install Node before we can install the npm package angular-cli. The minimum version of Node that is required for the the Angular CLI requires is Node 4.x but I would suggest installing the latest LTS version from https://nodejs.org which at the time of this writing is 6.9.1. To verify the version of node that you have installed, launch a command prompt and run node -v. If you need to install Node, download the LTS installer from https://nodejs.org and accept any prompts that the installer has.
After you have Node installed, we need to globally install the Angular CLI by running (it will take several minutes):
npm install -g @angular/cli
On Linux and Mac, you may need to run the command with sudo.
You can verify that the Angular CLI installed and the version by running the command below. As of this writing, the Angular CLI version is 1.0.0-beta.25.5
ng --version
If it says that ng is unknown, close the command prompt, re-open it and run ng –version again. If you are still having issues, leave a comment below and I will try to help you out.
Generating Your Angular 2 Project
After the Angular CLI is installed you can create a new project with the ng new command.
The ng new command does several things for you:
- Creates a directory named after the project name.
- Installs the npm dependencies
- Configures Webpack
- Adds a development and production environment configuration file
- Adds a placeholder file for the stylesheet. By default it is css based but with the –style=scss parameter that we are using below, it will make it scss based instead.
- Adds a routing file for the app module and import it into the App Module with the –routing parameter
- Adds unit testing spec files
Generate Project Steps
Open a command prompt
Navigate to where you want to store your project
- On Windows, I store mine at c:\projects and on Mac I stored it at ~/projects
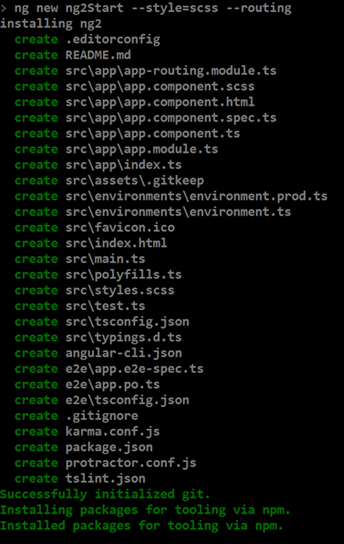
Generate the new project called angular2-getting-started by running the command below. It will take a few minutes to create and install the dependencies. I like to use scss instead of css for my styles which the style parameter enables. The routing parameter sets up the routing that we will use later on when we have more than 1 page to navigate to.
ng new angular2-getting-started –style=scss –routing
You can view the full documentation for the Angular CLI at https://github.com/angular/angular-cli
Running Your Angular 2 Project
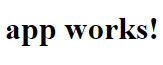
Now that we have our project generated, we can view it in a web browser by running ng serve to build it and start up a web server with live reload. Once ng serve has completed, open a web browser and navigate to http://localhost:4200/. You should be looking a page that says:
Project layout
If you look at the project directory and file layout there are some key pieces of the project that I have highlighted below.
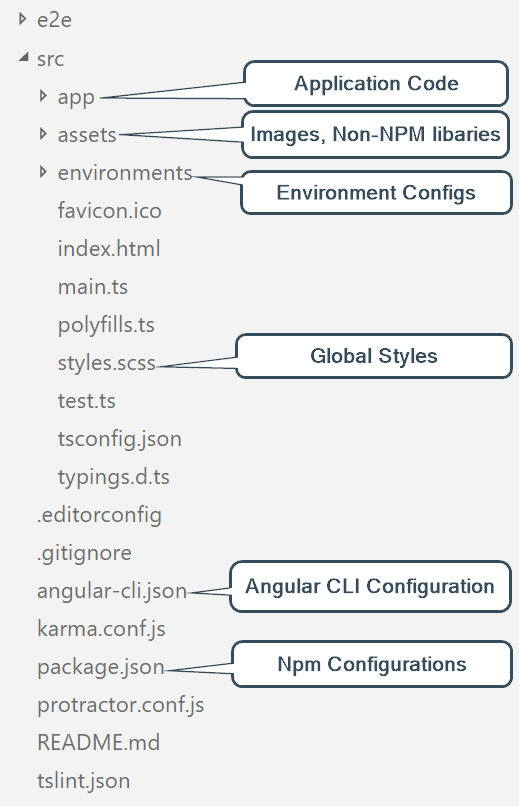
- src
- app -> Your Application Code
- asset -> Static Assets (/images, non-npm libaries, custom javascript that you created)
- environments -> Environment specific files. Will will look at these in a later post.
- styles.scss -> Application wide css. Any CSS that is not component specific.
- angular-cli.json -> Configuration for the Angular CLI and Webpack build
- package.json -> Standard npm configuration file for dependencies, scripts, project info
Wrapping up
At this point you have your Angular 2 project created and are ready to start coding. In the next post, we will add bootstrap for our styling.