Bitfocus Companion version 3 is in beta and they have made it way easier to do module development. In this post, we are going to get your computer set up to be able to do Companion module development.
This post will be broken into 3 parts:
- Get Companion Module on Your Computer
- Compile Companion Module
- Use Your Version of Companion Module in Your Companion Instance
- Pull Changes from Module Into Your Copy of the Module
Part 1: Get Companion Module on Your Computer
The module we will be using for this post is the ZoomOSC / ZoomISO module.
The code for all of the Companion modules is hosted on a GitHub repository. In part 1, we will be creating a GitHub account, create a copy of the companion module in your GitHub account and download the companion module code onto your machine.
Create GitHub Account
If you already have a GitHub account you can skip this step
It is free to get a GitHub account. Go to https://GitHub.com/signup and follow the prompts to create your account
Now you are ready to set up your GitHub account and download the code
Get Companion module code
You will need to create a copy of the GitHub repository called a Fork, so that we have our own copy of the module in GitHub.
From GitHub docs: A fork is a copy of a repository that you manage. Forks let you make changes to a project without affecting the original repository. You can fetch updates from or submit changes to the original repository with pull requests.
Go to https://github.com/bitfocus/companion-module-zoom-osc-iso
Click on the Fork button on the right side of the screen
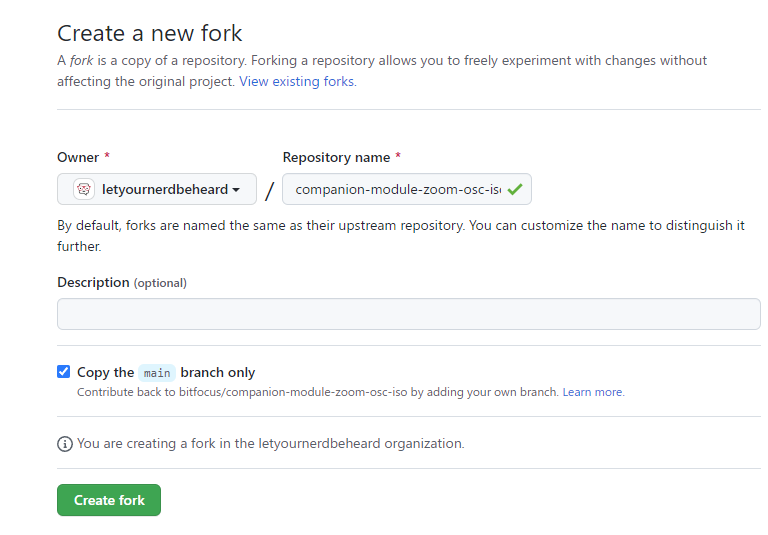
Once you click the create fork button, it will create your fork and then navigate your to the url for your fork.
Create Companion module dev directory
For all of your module development, you will need to create a single directory on your machine that any Companion module that you want to develop will go into
- Create a directory called companion-module-dev somewhere on your computer
Get Companion module onto your computer
Now that we have the directory that will contain our Companion modules, we need to actually get them onto your computer. We will install the Git command line tools so that you can clone (e.g. copy) the module onto your machine.
Go to https://git-scm.com/downloads and downlod the Git install for your OS
Open the installer for Git and follow the prompts. I just stick with the defaults
Open a terminal and navigate to the companion-module-dev folder
Run the following command to set up your Git name and email that will be used if you submit changes to the code
git config --global user.name "Your GitHub Name (e.g. First Name Last Name)"
git config --global user.email "Your GitHub email"
In the companion-module-dev folder run the following command to download the source code
git clone [Your GitHub Fork Url]for example, my GitHub fork is https://github.com/digitaldrummerj/companion-module-zoom-osc-iso
The git clone created a directory in the companion-module-dev folder called companion-module-zoom-osc-iso
In the terminal, go into the companion-module-zoom-osc-iso driectory
In the terminal within the companion-module-zoom-osc-iso directory run the following command to add a reference back to the original repository so that later on you can easily pull in code changes to the module
git remote add upstream https://github.com/bitfocus/companion-module-zoom-osc-iso
Part 2: Development Environment Setup
Now that we have a copy of the module code on GitHub and on our computer, we need to set up the development environment for Companion.
Node Install
The first thing we need to do is install Node 18.
- Navigate to https://github.com/Schniz/fnm#installation
- Follow the install instructions for your OS
- Follow the Shell Setup steps for your terminal type
Now that fnm is installed, we need to tell it which version of node to use
In a terminal window, install Node by running
fnm install 18Tell fnm to use Node 18 that we just installed
fnm use 18Tell fnm that Node 18 is our default Node version
fnm default 18Lastly, install enable the corepack
corepack enable
Code Editor Install
For editing the companion module code I like to use Visual Studio Code.
Part 3: Use Your Version of Companion Module in Your Companion Instance
Install Dependencies
Before we can use our Companion module in Companion, we need to install the dependencies for the module and compile the module.
Before we can install the module dependencies, we need to install Yarn. In your terminal windows run the following command:
npm install --global yarnNote: we are using Yarn 1.0 because that it what Companion is using and we want to stay on the same version as they are using.
Now that we got Yarn installed, we can install our module’s dependencies by running the following command in your module’s directory
yarn installThe module built after the yarn install. If you need to build the module again, you can run the following command
yarn dev
Install Companion
We are now ready to install Companion v3
Click Sign in if you have an account or Sign up if you need to create an account
After you login, click on the Download link on the left menu or navigate to https://user.bitfocus.io/download

For v3, there are two options: Beta or Experimental. The Beta is built every 6 hours. The experimental build is the latest and greatest.
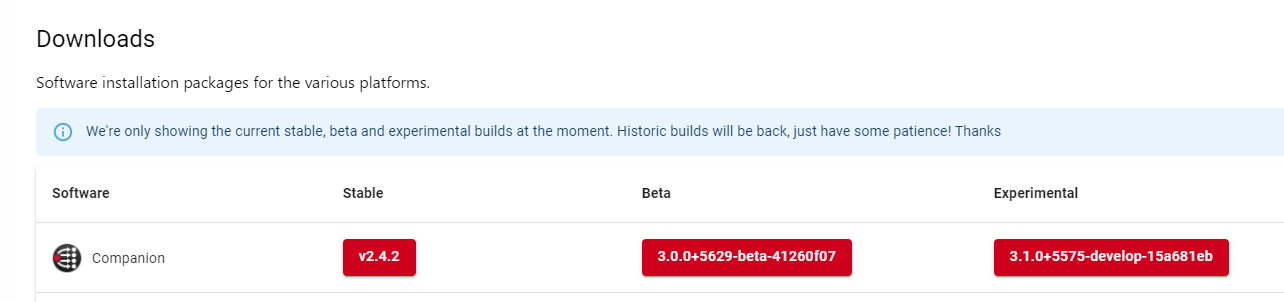
After you download Companion, run the installer and take all of the defaults.
WARNING: If you have Companion v2 installed on the same machine as you are installing Companion v3 on, you will share the configuration between your v2 and v3 instances but the commands and connections names are not the same between v2 and v3, so you will need a set of buttons for each version.
Start Companion
Now that we have Companion installed, we are ready to tell Companion that we want to use your development modules and then start Companion
Tell Companion About Your Development Modules
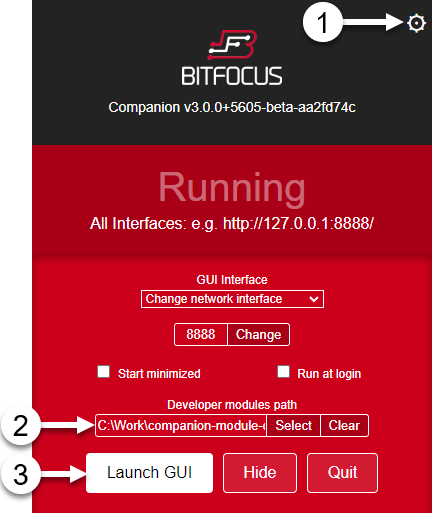
After you launch Companion, follow the steps below to tell Companion about your development modules
- Click on the Cog (step 1 in the image)
- Click on the Select for the Developer modules path (step 2 in the image)
- Click Launch GUI (step 3 in the image)
Part 4: Pull Changes from Module Into Your Copy of the Module
As the module developers make changes, you will want to pull those changes into your forked repository.
Open a terminal and navigate to your module’s directory that contains your forked repository
The first thing is to fetch all of the changes from the original repository. Note that commits to the original repository will be stored in a local branch called, upstream/master
git fetch upstreamMake sure that you are on your fork’s main branch
git checkout mainMerge the changes from the upstream/main into your local master branch. This will bring your fork’s master branch into sync with the upstream repository without losing your local changes. If you have made any changes that create a conflict, you will obviously have to resolve those before you can complete the merge.
git merge upstream/masterBuild the module
yarn dev