In several applications I work on, we have a requirement that we are not allowed to delete any data out of the database physically. Instead, when we need to delete a record, we set an IsDeleted column to true and exclude the row from our queries.
In this post, we will be implementing soft deletes on an example project.
This post is designed as a step-by-step walkthrough of the implementation. If you just want to look at the finished code, get it here
Create Sample Project
Open a terminal and navigate to where you want to store the example project we are going to create
Run dotnet new to create our WebApi project
dotnet new webapi -o EntityFrameworkExamplecd into the EntityFrameworkExample directory
cd EntityFrameworkExampleAdd a .gitignore file using the dotnet-ignore global tool
dotnet-ignore get -n visualstudio.gitignoreIf you do not have the dotnet-ignore global dotnet tool installed, check out my post on how to install the tool, here
Install the EntityFramework Core Sql Server package
dotnet add package Microsoft.EntityFrameworkCore.SqlServer
Create Tables
Now that our example project is created, we need to create our data model. We are going to create two tables, Blog and Post.
Create directory EntityFramework
EntityFrameworkCreate a directory in EntityFramework called Entities
EntitiesCreate Blog.cs in EntityFramework\Entities\
Blog.csAdd the following code to the Blog.cs file to create a Blogs table with two columns and a relationship with the Post table.
using System.ComponentModel.DataAnnotations;
using System.ComponentModel.DataAnnotations.Schema;

namespace EntityFrameworkExample.Entities;

[Table("Blogs")]
public class Blog
{
    [Key, DatabaseGenerated(DatabaseGeneratedOption.Identity)]
    public int Id { get; set; }

    [Required]
    [MaxLength(255)]
    public string Name { get; set; }

    [Required]
    [MaxLength(2048)]
    public string Url { get; set; }

    [InverseProperty(nameof(Blog))]
    public List<Post> Posts { get; set; } = new List<Post>();
}
Create Post.cs in EntityFramework\Entities directory
Post.csAdd the following code to Post.cs to create the Post table with several columns and the relationship to the Blog table.
using System.ComponentModel.DataAnnotations;
using System.ComponentModel.DataAnnotations.Schema;

namespace EntityFrameworkExample.Entities;

[Table("Posts")]
public class Post
{
    [Key, DatabaseGenerated(DatabaseGeneratedOption.Identity)]
    public int Id { get; set; }

    [Required]
    [MaxLength(255)]
    public string Title { get; set; }

    [Required]
    [MaxLength(100)]
    public string Url { get; set; }

    public bool IsDraft { get; set; }

    public string Content { get; set; }

    public int BlogId { get; set; }

    [ForeignKey(nameof(BlogId))]
    public Blog Blog { get; set; }
}
Create Context
Now that our entities are created, we are ready to create our database context for Entity Framework.
In the EntityFramework directory, create a file called EntityFrameworkExampleContext.cs
EntityFrameworkExampleContext.csIn the EntityFrameworkExampleContext.cs file, add the following code to tell EntityFramework about the Blog and Post table.
using EntityFrameworkExample.Entities;
using Microsoft.EntityFrameworkCore;
namespace EntityFrameworkExample;

public class EntityFrameworkExampleContext : DbContext
{
    public EntityFrameworkExampleContext(DbContextOptions options) : base(options)
    {
    }

    public DbSet<Blog> Blog { get; set; }

    public DbSet<Post> Post { get; set; }
}
Add Context to ASP.NET Core Startup
Now that we have our tables and EF Core context file, we are ready to add the context to the ASP.NET Core startup.
In Program.cs, we need to add the database context to the Services.
Add the following namespaces
using EntityFrameworkExample;
using Microsoft.EntityFrameworkCore;
Add the connection string before the call to
var app = builder.Build();string connectionString = "(localdb)\mssqllocaldb;Database=EntityFrameworkExample;ConnectRetryCount=0;Trusted_Connection=True;"; builder.Services .AddDbContext<EntityFrameworkExampleContext>(opt => opt.UseSqlServer(connectionString));If you have Visual Studio installed, it comes with the localdb.
Using Docker for Sql Server
If you do not have Visual Studio installed, you can use Docker to run an instance of Visual Studio and then update the connection string to connect to the docker instance.
docker pull mcr.microsoft.com/mssql/server:2019-latest
docker run --name sql_2019_1436 -e "ACCEPT_EULA=Y" -e "SA_PASSWORD=1Secure*Password1" -e "MSSQL_PID=Enterprise" -p 1436:1433 -d mcr.microsoft.com/mssql/server:2019-latest
If you are using docker, you will need to update your connection string in Program.cs to point localhost,1436, and the sa username and password.
string connectionString = "Server=localhost,1436;Database=EntityFrameworkExample;ConnectRetryCount=0;User ID=sa;Password=1Secure*Password1";
Create Controllers for Blog and Post
Next, we need to create a controller for Blog and Post to be able to perform CRUD operations. We are going to use the dotnet cli to scaffold the controller.
We have a few packages to add:
dotnet add package Microsoft.VisualStudio.Web.CodeGeneration.Design
dotnet add package Microsoft.EntityFrameworkCore.Design
dotnet add package Microsoft.EntityFrameworkCore.Design
Next, we need to install the ASP.NET Code Generator global tool.
dotnet tool install -g dotnet-aspnet-codegenerator
Now, we are ready to scaffold the Blog controller.
dotnet aspnet-codegenerator controller -name BlogController -async -api -m Blog -dc EntityFrameworkExampleContext -outD ir Controllers
and the Post controller
dotnet aspnet-codegenerator controller -name PostController -async -api -m Post -dc EntityFrameworkExampleContext -outDir Controllers
Create Database
Before running our WebApi, we need to create our database and database tables. I will use EntityFramework’s migration tool to create scripts that are then applied to our database.
We need to install the EF Core tools
dotnet tool install --global dotnet-efTo create our database migration script and save it to the EntityFramework\Migrations\ directory, run:
dotnet ef migrations add InitialCreate -o .\EntityFramework\MigrationsTo run the script against our database, we need to call the database update command for dotnet ef.
dotnet ef database update
You are now ready to start the project and navigate to the /swagger url and test out the controller. You should see the following Swagger screen.
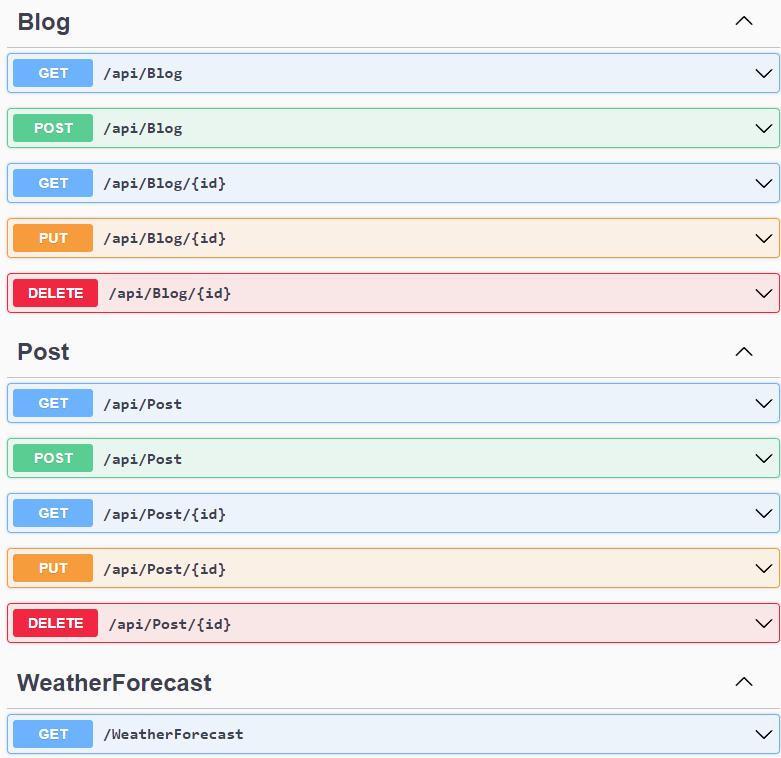
Right now, it does not have soft deletes enabled, but before implementing soft deletes, we want to make sure that the basic API is working.
Add IsDeleted Column to Tables
To make it easy to make sure that all tables get the IsDeleted field added to them, we are going to create a base class that will contain the IsDeleted and Id columns so that we do not have to remember to add it to each table.
Create directory EntityFramework\Entities\Base
BaseIn the Base directory, create a file named IEntityBase.cs.
IEntityBase.csThe IEntityBase.cs will be an interface that will define our default columns and needs the following code for the Id and IsDeleted columns
namespace EntityFrameworkExample.Entities;

public interface IEntityBase
{
    int Id { get; set; }

    bool IsDeleted { get; set; }
}
In the Base directory, create a file named EntityBase.cs which will be used to implement the Id and IsDeleted columns. We will use an abstract class to ensure that we never directly create a new EntityBase class.
EntityBase.csAdd the following code to the EntityBase.cs to implement the Id and IsDeleted column. The Id column will be defined as an auto-incrementing column for Sql Server.
using System.ComponentModel.DataAnnotations;
using System.ComponentModel.DataAnnotations.Schema;

namespace EntityFrameworkExample.Entities;

public abstract class EntityBase : IEntityBase
{
    [Key, DatabaseGenerated(DatabaseGeneratedOption.Identity)]
    public int Id { get; set; }

    public bool IsDeleted { get; set; }
}
Now that we have our base class for our entities, we need to update Blog and Post to use the base class.
Update the class definition for Blog to inherit from EntityBase
public class Blog : EntityBaseFrom the Blog class remove the Id definition since it is now included in the base class.
Update the class definition for Post to inherit from EntityBase
public class Post : EntityBaseFrom the Post class remove the Id definition since it is now included in the base class.
We need to create a migration for adding the IsDeleted column to Blog and Post.
dotnet ef migrations add AddIsDeleted -o .\EntityFramework\Migrations\Then, we need to apply the migration script to our database
dotnet ef database update
Update Database Context to Override Delete Operation
Now we are ready to change how EF Core runs the delete operations so that it sets the IsDeleted flag to true and leaves the record in the database. We will do this by updating our DbContext to override the save methods to change all delete operations from an entity that inherits from IEntityBase into an update operation that sets the IsDeleted to true.
Before we update our DbContext file, we are going to create an extension method that will take in an EF Core ChangeTracker and modify the entities that EF Core is going to delete.
Create the directory, EntityFramework\Extensions
ExtensionsCreate the file, EntityFramework\Extensions\ChangeTrackerExtension.cs
ChangeTrackerExtension.csAdd the following code to ChangeTrackerExtension.cs to get all entities that inherit from IEntityBase and are part of the delete operation and then update the entity to have the IsDeleted set to true and make it an update operation instead so that the record stays in the database.
using EntityFrameworkExample.Entities;
using Microsoft.EntityFrameworkCore;
using Microsoft.EntityFrameworkCore.ChangeTracking;

namespace EntityFrameworkExample.Extensions;

public static class ChangeTrackerExtensions
{
    public static void SetAuditProperties(this ChangeTracker changeTracker)
    {
        changeTracker.DetectChanges();
        IEnumerable<EntityEntry> entities =
            changeTracker
                .Entries()
                .Where(t => t.Entity is IEntityBase && t.State == EntityState.Deleted);

        if (entities.Any())
        {
            foreach(EntityEntry entry in entities)
            {
                IEntityBase entity = (IEntityBase)entry.Entity;
                entity.IsDeleted = true;
                entry.State = EntityState.Modified;
            }
        }
    }
}
Now we are ready to update our DbContext to use the ChangeTracker Extension we just created. We need to override four methods in our DbContext file (EntityFrameworkExampleContext.cs) to call the ChangeTracker before saving the changes.
SaveChangesAsync (CancellationToken cancellationToken)
    public override async  Task<int> SaveChangesAsync(CancellationToken cancellationToken = default)
{
    ChangeTracker.SetAuditProperties();
    return await base.SaveChangesAsync(cancellationToken);
}
SaveChangesAsync (bool acceptAllChangesOnSuccess, CancellationToken cancellationToken)
public override async Task<int> SaveChangesAsync(bool acceptAllChangesOnSuccess, CancellationToken cancellationToken = default)
{
    ChangeTracker.SetAuditProperties();
    return await base.SaveChangesAsync(acceptAllChangesOnSuccess, cancellationToken);
}
SaveChanges
public override int SaveChanges()
{
    ChangeTracker.SetAuditProperties();
    return base.SaveChanges();
}
SaveChanges(bool acceptAllChangesOnSuccess)
public override int SaveChanges(bool acceptAllChangesOnSuccess)
{
    ChangeTracker.SetAuditProperties();
    return base.SaveChanges(acceptAllChangesOnSuccess);
}
Add the using statement for the ChangeTrackerExtension to the Context file
using EntityFrameworkExample.Extensions;
You are now ready to test that the IsDelete works:
- Run the application and go to the Swagger UI (/swagger)
- On the Blog, run the post operation to insert a new Blog
- Grab the Id value from the Blog
- Run the delete operation for the Blog Id
- Run the get call for the Blogs and notice that the record is still there, but the IsDelete is set to true.
Filter Out Deleted Rows
At this point, our soft delete is working, but in most cases, we want to filter out records with IsDelete set to true. We could do this by adding a where clause onto all of our queries, but there is a much easier way which is to use an EF Core Global filter for each entity.
Even though we could add the global filter onto each entity, there is a high likely hood that you will forget to do it at least once. Instead, we can implement an EntityTypeConfiguration that allows us to add default configurations for each entity that inherits from it and configurations specific to that entity like indexes.
Create the directory EntityFramework\Maps
MapsCreate the directory EntityFramework\Maps\Base
BaseCreate the EntityFramework\Maps\Base\IEntityMapBase.cs
IEntityMapBase.csAdd the following code to the IEntityMapBase.cs
using Microsoft.EntityFrameworkCore;

namespace EntityFrameworkExample.Maps;

public interface IEntityMap<TEntity> : IEntityTypeConfiguration<TEntity> where TEntity : class
{

}
Create the file EntityFramework\Maps\Base\EntityMapBase.cs
EntityMapBase.csAdd the following code to the EntityMapBase.cs to set the HasQueryFilter property.
using EntityFrameworkExample.Entities;

using Microsoft.EntityFrameworkCore.Metadata.Builders;

namespace EntityFrameworkExample.Maps;

public abstract class EntityMapBase<TEntity> : IEntityMap<TEntity> where TEntity : class, IEntityBase
{
    public virtual void Configure(EntityTypeBuilder<TEntity> builder)
    {
        builder.HasQueryFilter(t => t.IsDeleted == false);
    }
}
Now we are ready to create the EntityMap configuration for our Blog and Post entities.
Create the file EntityFramework\Maps\BlogMap.cs
BlogMap.csAdd the following code to the BlogMap.cs to implement the EntityMap. Right now, we are not adding more configurations like indexes, but if you did need to do that, you would add it in the Configure method after the call to the base configures.
using EntityFrameworkExample.Entities;

using Microsoft.EntityFrameworkCore.Metadata.Builders;

namespace EntityFrameworkExample.Maps;

public class BlogMap : EntityMapBase<Blog>
{
    public override void Configure(EntityTypeBuilder<Blog> builder)
    {
        base.Configure(builder);
    }
}
Create the file EntityFramework\Maps\PostMap.cs
PostMap.csAdd the following code to the PostMap.cs to implement the EntityMap. Right now, we are not adding more configurations like indexes, but if you did need to do that, you would add it in the Configure method after the call to the base configure.
using EntityFrameworkExample.Entities;
using Microsoft.EntityFrameworkCore.Metadata.Builders;

namespace EntityFrameworkExample.Maps;

public class PostMap : EntityMapBase<Post>
{
    public override void Configure(EntityTypeBuilder<Post> builder)
    {
        base.Configure(builder);
    }
}
Now, we need to tell our DbContext (EntityFrameworkExampleContext), about the EntityMap configuration for our Blog and Post entities by overriding the OnModelCreating method
protected override void OnModelCreating(ModelBuild  er modelBuilder)
{
    modelBuilder.ApplyConfiguration(new BlogMap());
    modelBuilder.ApplyConfiguration(new PostMap());
}
Add the using statement to the DbContext for the BlogMap and PostMap
using EntityFrameworkExample.Maps;
If you start up the application and run the get call for Blog, you will see that it no longer returns the record with the IsDelete set to true as it did before. If you need to write a query to return the IsDeleted is true records, on the individual queries, you would add a call to IgnoreQueryFilters() as part of the query.
Whew, you made it. I know it was a lot of steps and code to walk through, but you did it and completed the implementation of EF Core soft deletes. If you found this post helpful, please share this post on Twitter and Facebook using the share buttons below.