I have many posts on this site that include code snippets for the reader to cut and paste into their code. From a usability perspective, instead of always making the user select lines from the code snippet to copy and paste, we can add a copy button to the code snippet.
example without line numbers:

example with line numbers:
This post will look at how to implement the copy button, as you see in the above images, any time that we detect a code snippet on a post.
Requirements
There are a few requirements to make this work.
- Automatically add the copy button without having to add specific to a post
- Works with both line numbers on and line numbers off
- Only copy the code and not the line numbers
- Copy button says “Copied” after clicking on it and then goes back to copy after a few seconds
- Work cross-browser
- Copy button is located within the code snippet section
- The type of code snippet is added to the top left above the code snippet
To make all of this work, we need to configure the Hugo highlighter, add some styles to the highlighter, write some JavaScript to add the copy button dynamically and style the copy button.
Hugo Highlighter Site Configuration
The first thing we will do is configure the Hugo syntax highlighter.
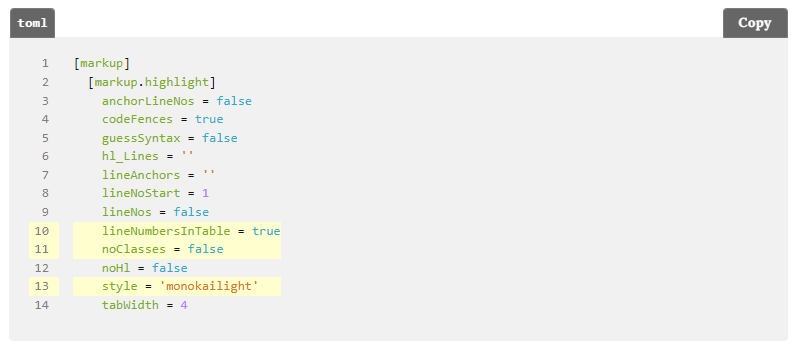
Highlighter Configuration
| |
- Line 10 (lineNumbersInTable): When adding line numbers like this example, use a table instead of inlining the numbers. This is important to be able to copy just the code and not the line number.
- Line 11 (noClasses): Determines if CSS classes are used or not. We can set it to false to indicate that we want to use CSS classes
- Line 13 (style): This is the highlighter color scheme. You can see all of the color schemes here
Highlighter Color Scheme
When you have the noClasses set to false, you need to create a style for the color schema. In this case, I am using the monokailight color schema.
To generate the CSS:
- Open a terminal and navigate to your project
- Run the command below and replace the style with the one you want.
hugo gen chromastyles --style monokailight assets\css\syntax.css
If you are using the monokailight style, I found that the background of the code snippet was too dim and that the .err class was set to red and triggered for random things like the : in https: for links. In my syntax.css file, I changed the following two classes.
/* Background */ .chroma { color: #272822; background-color: #f1f1f1; }
/* Error */ .chroma .err { color: #272822; background-color: #f1f1f1; }
Add Copy Button on Fly to Code Snippet
Next, we will create the JavaScript code that will add the copy button and copy the code snippet to the clipboard.
Start by creating the file assets\js\copy-code-button.js
Once the file is created, we need to add a function to create the button and then find all elements with a .highlight CSS class and add a copy button to each one.
function createCopyButton(highlightDiv) {
  const button = document.createElement("button");
  button.className = "copy-code-button";
  button.type = "button";
  button.innerText = "Copy";
  button.addEventListener("click", () => copyCodeToClipboard(button, highlightDiv));
  highlightDiv.insertBefore(button, highlightDiv.firstChild);

  const wrapper = document.createElement("div");
  wrapper.className = "highlight-wrapper";
  highlightDiv.parentNode.insertBefore(wrapper, highlightDiv);
  wrapper.appendChild(highlightDiv);
}

document.querySelectorAll(".highlight").forEach((highlightDiv) => createCopyButton(highlightDiv));
The last bit of JavaScript that we need to create is the function to copy the code snippet to the clipboard, change the button to say “Copied” and then back to Copy after 2 seconds.
This JavaScript will also work with line numbers as we set the line numbers to be in a table and with our querySelector, we are just grabbing the elements that have the actual code we want to be copied to the clipboard.
We are also working around if the clipboard API not being present in the copyCodeBlockExecCommand function
async function copyCodeToClipboard(button, highlightDiv) {
  const codeToCopy = highlightDiv.querySelector(":last-child > .chroma > code").innerText;
  try {
    var result = await navigator.permissions.query({ name: "clipboard-write" });
    if (result.state == "granted" || result.state == "prompt") {
      await navigator.clipboard.writeText(codeToCopy);
    } else {
      copyCodeBlockExecCommand(codeToCopy, highlightDiv);
    }
  } catch (_) {
    copyCodeBlockExecCommand(codeToCopy, highlightDiv);
  } finally {
 button.blur();
  button.innerText = "Copied!";
  setTimeout(function () {
    button.innerText = "Copy";
  }, 2000);  }
}

function copyCodeBlockExecCommand(codeToCopy, highlightDiv) {
  const textArea = document.createElement("textArea");
  textArea.contentEditable = "true";
  textArea.readOnly = "false";
  textArea.className = "copyable-text-area";
  textArea.value = codeToCopy;
  highlightDiv.insertBefore(textArea, highlightDiv.firstChild);
  const range = document.createRange();
  range.selectNodeContents(textArea);
  const sel = window.getSelection();
  sel.removeAllRanges();
  sel.addRange(range);
  textArea.setSelectionRange(0, 999999);
  document.execCommand("copy");
  highlightDiv.removeChild(textArea);
}
Making the Copy Button Look Pretty
Now let’s make our Copy button look pretty and styled as we want it.
Create the file assets\css\copy-code-button.css and add the following code to it. The CSS Code sets the border, padding, margin, and positioning of the copy button.
.highlight-wrapper {
  display: block;
}

/* Start: Turn off individual column border, margin, and padding when line numbers are showing */
.highlight-wrapper .lntd pre {
    padding: 0;
}

.chroma .lntd pre {
    border: 0px solid #ccc;
}

.chroma .lntd:first-child {
  padding: 7px 7px 7px 10px;
  margin: 0;
}

.chroma .lntd:last-child {
  padding: 7px 10px 7px 7px;
  margin: 0;
}
/* End: Turn off individual column border, margin, and padding when line numbers are showing */

.highlight {
  position: relative;
  z-index: 0;
  padding: 0;
  margin:40px 0 10px 0;
  border-radius: 4px;
}

.highlight > .chroma {
  position: static;
  z-index: 1;
  border-top-left-radius: 0px;
  border-top-right-radius: 0px;
  border-bottom-left-radius: 4px;
  border-bottom-right-radius: 4px;
  padding: 10px;
}

.copy-code-button {
  position: absolute;
  z-index: 2;
  right: 0;
  top: -29px;
  font-size: 13px;
  font-weight: 700;
  line-height: 14px;
  letter-spacing: 0.5px;
  width: 65px;
  color: #ffffff;
  background-color: #000000;
  border: 1.25px solid #232326;
  border-top-left-radius: 4px;
  border-top-right-radius: 4px;
  border-bottom-right-radius: 0px;
  border-bottom-left-radius: 0px;
  white-space: nowrap;
  padding: 6px 6px 7px 6px;
  margin: 0 0 0 1px;
  cursor: pointer;
  opacity: 0.6;
}

.copy-code-button:hover,
.copy-code-button:focus,
.copy-code-button:active,
.copy-code-button:active:hover {
  color: #222225;
  background-color: #b3b3b3;
  opacity: 0.8;
}

.copyable-text-area {
  position: absolute;
  height: 0;
  z-index: -1;
  opacity: .01;
}
.chroma [data-lang]:before {
  position: absolute;
  z-index: 0;
  top: -29px;
  left: 0;
  content: attr(data-lang);
  font-size: 13px;
  font-weight: 700;
  color: white;
  background-color: black;
  border-top-left-radius: 4px;
  border-top-right-radius: 4px;
  border-bottom-left-radius: 0;
  border-bottom-right-radius: 0;
  padding: 6px 6px 7px 6px;
  line-height: 14px;
  opacity: 0.6;
  position: absolute;
  letter-spacing: 0.5px;
  border: 1.25px solid #232326;
  margin: 0 0 0 1px;
}
Add CSS and JavaScript Files to Site
Now that we have configured the Hugo highlighter, created our JavaScript code and CSS for the copy button, we need to add the CSS and JavaScript file to the site.
The CSS files will go into the <head> and the JavaScript files will go at the bottom of the footer.html file. We will also minify them, which is why we put them into the asset folder earlier.
In your header, add the following lines after your site’s CSS import. This will minify your CSS in the Assets folder and add the <link> reference to the CSS file.
{{ if (findRE "<pre" .Content 1) }}
    {{ $syntax := resources.Get "css/syntax.css" | minify }}
    <link href="{{ $syntax.RelPermalink }}" rel="stylesheet">

    {{ $copyCss := resources.Get "css/copy-code-button.css" | minify }}
    <link href="{{ $copyCss.RelPermalink }}" rel="stylesheet">
{{ end }}
In your footer, add the following after the rest of your JavaScript code input.
{{ if (findRE "<pre" .Content 1) }}
{{ $jsCopy := resources.Get "js/copy-code-button.js" | minify }}
<script src="{{ $jsCopy.RelPermalink }}"></script>
{{ end }}
Now any time you navigate to a page on your site with a code snippet (e.g. <pre> tag), a copy button will be added to the code snippet, and the code snippet will be copied to the clipboard.
Inspiration for Copy Button
Inspiration for the copy code button came from the following posts.
https://www.dannyguo.com/blog/how-to-add-copy-to-clipboard-buttons-to-code-blocks-in-hugo/
https://aaronluna.dev/blog/add-copy-button-to-code-blocks-hugo-chroma/