In our previous post, we create a page to view our posts grouped by month. In this post, we are going to create a page to show post grouped by category.
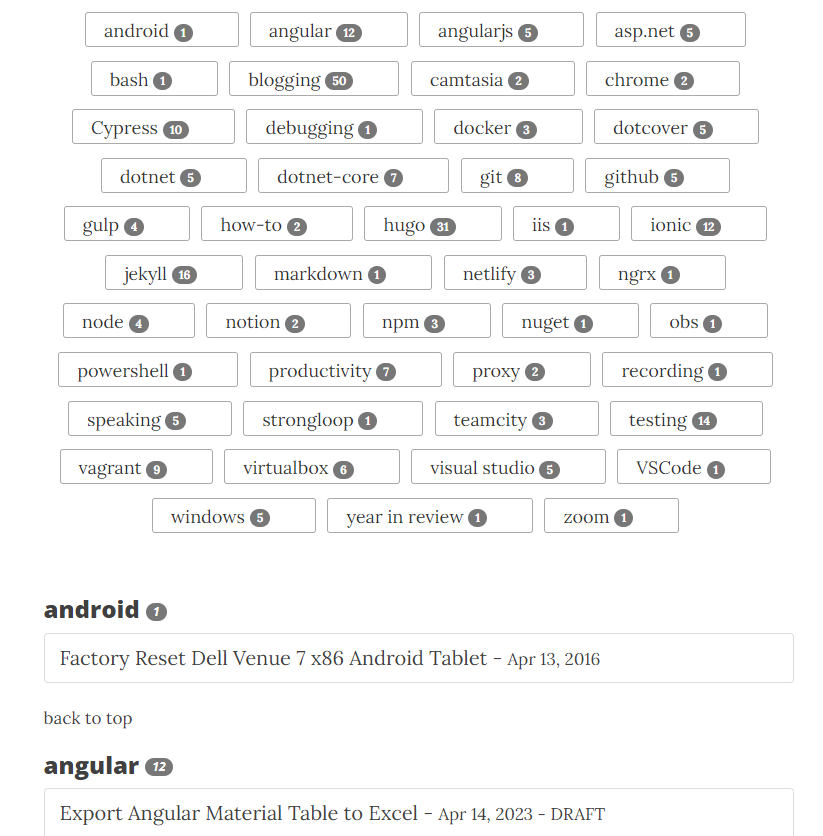
Example of What We Are Building:
For the category list, we are going to take advantage of a feature of Hugo called taxonomies which basically allows to create a group that post can belong to.
For the category taxonomy, Hugo enables this out of the box for us. If you wanted to create other taxonomies, you would need to add them to our Hugo config.toml
[taxonomies]
  category = “categories”
With the category taxonomy created, we now need to generate our page. There are the following options are available:
- layouts_default\term.html : default page that displays the terms (e.g. categories)
- layouts_default\taxonomy.html : default page that display all of the posts for a term
- layouts\categories\term.html : override the default term page just for the categories taxonomy
- layouts\categories\taxonomy.html : override the default taxonomy.html for the category
For the purpose of this article, we are just going to create the files in the layouts\categories folder to have a custom page for display the category that overrides that default display of a term.
Create the directory in your theme’s layout folder called categories
Create a file in the
layouts\categoriesfolder called terms.htmlAdd the following to the
terms.htmlfile to show the list of categories, have each category link to later in the page, and show the number of post per category{{ define "main"}} <!-- Main Content --> <div class="container"> <div class="row"> <div class="col-lg-8 col-lg-offset-2 col-md-10 col-md-offset-1"> <a name="top"></a> {{ if not (eq (len $.Data.Terms) 0) }} <div> <div class="tagcloud03"> <ul> {{ range .Data.Terms.Alphabetical }} <li> <a href="#{{ .Page.Title | urlize}}">{{ .Page.Title }} <span class="badge">{{ .Count }}</span> </a> </li> {{ end }} </ul> </div> <div> {{ range .Data.Terms.Alphabetical }} <h3> <a name="{{ .Page.Title | urlize }}"></a>{{ .Page.Title}} <i class="badge">{{ .Count }}</i> </h3> <ul class="list-group striped-list"> {{ range .Pages }} <li class="list-group-item"> <a href="{{ .RelPermalink }}"> {{ .Title }} {{ if .Params.subheadline }} ({{ .Params.subheadline }}){{ end }} - <small>{{ .PublishDate.Format "Jan 02, 2006" }}{{ partial "draft" . }}</small></a> </li> {{ end }} </ul> <a href="#top"> <small>back to top</small> </a> {{ end }} </div> </div> {{ end }} </div> </div> </div> {{ end }}To create the category list summary page for when a category is directly pulled up, you need to add the a file called
layouts\categories\taxonomy.htmlTo the
taxonomy.htmlfile, add the following code to the page to display the list of categories{{ define "main" }} <!-- Main Content --> <div class="container"> <div class="row"> <div class="col-lg-8 col-lg-offset-2 col-md-10 col-md-offset-1"> {{ range .Pages }} {{ .Render "summary" }} {{ end }} </div> </div> </div> {{ end }}
The last thing we need to do is add a bit of CSS to style our list the way we want it to be designed.
- Open the css file
static\css\clean-blog.min.css - Add the following code to the bottom of the file
.tagcloud03 {
  margin-bottom: 50px;
  text-align: center
}
.tagcloud03 ul.cloud li {
  margin: 0;
}
.tagcloud03 ul.cloud li a {
  padding: 0 1em 0 1em;
  /* border: none !important; */
  border: none;
  height: 45px;
  padding-top: 5px;
  padding-bottom: 5px;
}
.tagcloud03 ul {
  margin: 0;
  padding: 0;
  list-style: none;
}
.tagcloud03 ul li {
  display: inline-block;
  margin: 0 0.3em 0.3em 0;
  padding: 0;
}
.tagcloud03 ul li a {
  position: relative;
  display: inline-block;
  max-width: 250px;
  height: 35px;
  line-height: 35px;
  padding: 0 2.5em 0 1em;
  background-color: #fff;
  border: 1px solid #aaa;
  border-radius: 3px;
  white-space: nowrap;
  text-overflow: ellipsis;
  overflow: hidden;
  color: #333;
  font-size: 18px;
  text-decoration: none;
  -webkit-transition: 0.2s;
  transition: 0.2s;
}
.tagcloud03 ul li a:hover {
  background-color: #4b56a8;
  border: 1px solid #0085A1;
  color: #fff;
}
Now you have a custom category list and summary page.
In our next post on Hugo, we will create a page to look at posts categories in a word cloud.