In our post on Creating Your Blog Using Hugo, the theme that I provided you included the archive page that allows you to page through all of the posts you have written. By default, Hugo only shows 10 posts at a time and then you need to have an archive page that pages through the remaining posts. Even though I provided you with the archive page, I want to examine how that page works so you know how you can customize the page to match the look and feel you want.
The archive page is available in our theme at /posts. To generate this HTML, we use a combination of files:
- layouts_default\baseof.html : this file contains the starting point template for all pages. We have a header and footer in our file and then pull in the main block that we will define in the template for the page we are rendering.
- layouts_defaut\list.html : for every type of taxonomy in Hugo (post, page, etc) that we want to get a list view of, it will use this file. The main section is defined that the baseof.html file is using.
- layouts\posts\archive.html : in our list.html, we tell it to render the archive, which refers to this file for the html to render
- layouts\partials\meta.html : renders the post tag and categories. This file is used both in the post list page and the render of an individual page.
- _internal/pagination.html : this is an internal file for Hugo that we can use to page through results.
Let’s break down how our post archive page is generated.
post list page:
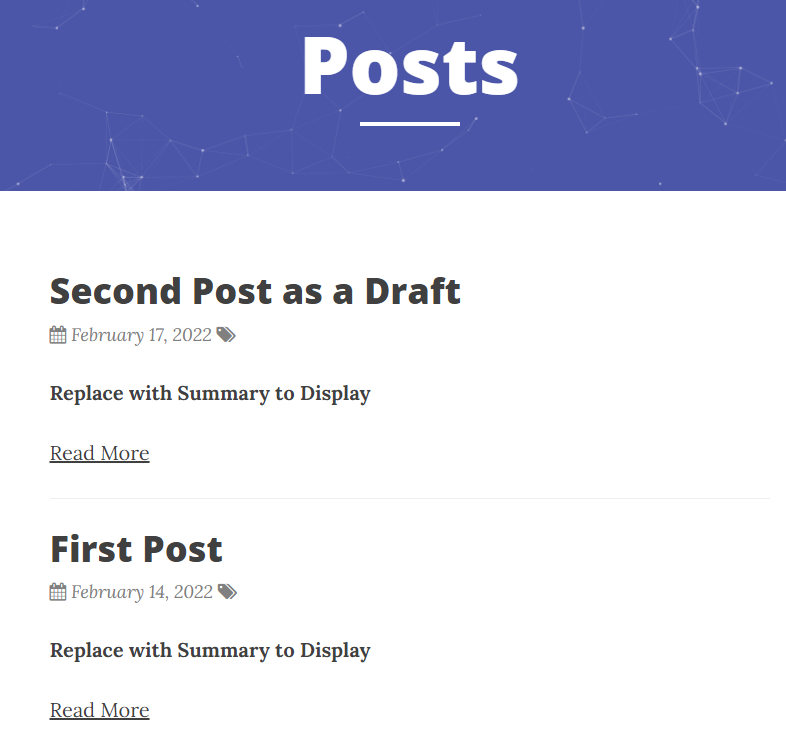
First, we added a header to the page to display the title and description of the page.
The first thing we do is define the main section to reuse it in our baseof.html page.
{{ define "main" }}
<!-- Page Header -->
<!-- Main Content -->
{{ end }}
Within the main section, we have two sections: the page header and the post’s content.
For our page header, we show the purple background image to be consistent with the rest of the site and then the title and description.
<!-- Page Header -->
<header class="intro-header" style="background-image: url('{{ .Site.BaseURL }}{{ .Site.Params.defaultHeaderImage }}')">
    <div class="container">
    <div class="row">
        <div class="col-lg-8 col-lg-offset-2 col-md-10 col-md-offset-1">
        <div class="site-heading">
            <h1>{{ .Title }}</h1>
            <hr class="small">
            <span class="subheading">{{ .Description }}</span>
        </div>
        </div>
    </div>
    </div>
</header>
header:

To display each post, we use the Hugo range, which loops through the posts to be rendered by using{{ range .Paginator.Pages }} and then render the archive.html file for each post. Then after the post, we show the list of pages.
<!-- Main Content -->
<div class="container">
    <div class="row">
    <div class="col-lg-8 col-lg-offset-2 col-md-10 col-md-offset-1">
        {{ range .Paginator.Pages }}
            {{ .Render "archive" }}
        {{ end }}
        {{ template "_internal/pagination.html" . }}
    </div>
    </div>
</div>
posts:
pager:

The last thing that we will look at is the HTML rendered for each of the posts. This code is in the layouts\posts\archive.html.
This code will display a featured image if we define one in the front matter at the top of the post markdown file.
Then it will display the post title and link it to the page to go to the full post, followed by the date/categories for the post, then the summary of the post, and then a read more link that will take the viewer to the page to see the full post.
<div class="post-preview">
  {{ if .Params.featured_image }}<a href="{{ .Permalink }}"><img src="{{ .Params.featured_image }}"></a>{{ end }}

  <a href="{{ .Permalink }}">
    <h2 class="post-title">{{ .Title | markdownify }}</h2>
  </a>
  <p class="post-meta">{{ partial "meta.html" .}}</p>
  <p class="post-subtitle">{{ .Summary }}</p>
  <p>
    <a href="{{ .Permalink }}">Read More</a>
  </p>
</div>
<hr />
The last page to look at is the meta.html partial. This code will display the date if the date is defined on the post and in the format that we want, Month Date, Year (e.g., February 18, 2022). Then if there are categories defined on the post, they will be displayed, and if there is more than one category, they will be separated by a /
{{ if .Params.Date }}
    <span><span class="fa fa-calendar"></span>
    <time datetime="{{ dateFormat (.Site.Params.DateForm | default "Mon, Jan 2, 2006") .Date }}">
        {{ dateFormat (.Site.Params.DateForm | default "Mon, Jan 2, 2006") .Date }}
        </time>
    </span>
{{ end }}

{{ if .Params.categories }}
{{ $len := len .Params.categories }}
<span class="meta-tags">
  <span class="fa fa-tags"></span>
  <span>
{{ range $index, $category := .Params.categories }}{{ if  (gt $index 0) }} / {{ end }}{{.}}{{ end }}
</span></span>
{{ end }}
You can now customize the look and feel of the post list. To customize the page, you have two options:
- Customize the page the theme folder
- If you do not want to modify the theme directly, you can override it by mirroring the folder structure within the layouts folder of your site. Hugo will take care of using your version instead of the theme version. You can even reference the partials like the meta date/category within your override file.
I like to modify the theme versus overriding it in the layouts folder since I am typically just adding a minor tweak or two to the format and do not need to override the layout entirely.
In our next post on Hugo, we will add a page to our blog that will display our post list grouped by month and sorted by date. You can see a preview here of what we will be created.